
This project was broken up into 3 project sprints. Between these sprints we completed two milestone report to track our progress. Below we have the reports archived
After about 1 week of working on the project our team was able to make progress on three major fronts:
#1 Computational Set-up
In order to operate the Widow X with our computers we used the the robot bridge repository from Beverly Robot and AI laboratory.
We were also able to get a functional simulator running for the Widow X on each of our computers using the Trossen robotics x series arms simulator. This will be invaluable for testing as we begin to write our own nodes and don’t all have access to the Widow X at the same times.
We also started a collection of helpful commands for controlling the robot
#2 Background Research
Before we started working on our node network we did some research on previous uses of the Widow X, previous chess bots and kinematic arm theory. We learned a lot about how package for the widow X can be structured, parallel vs forward kinematics arm theory and machine vision depth solutions that will inform how we structure our project.
#3 Structure Plan
Our structure plan is the precursor of our system architecture that we will be finalizing in the next few days. It can be seen in greater detail below. While we were designing this we tried to keep in mind what the objective of the project was and how we could scope our MVP accordingly. For example, the objective of this project is not to estimate depth using stereo vision. Therefore for our MVP we are finding alternative ways of estimating a chess pieces pose in the three dimensional space.
Though some of the finer details to this project have not yet been decided we have a much better idea of what kinds of problems we will have to solve and are excited to starting tackling them.
Package Structure
We intend to structure our package in (at least) the following nodes
1. Perception
This node will intake information from the camera and use it to determine which pieces are stored in which squares.
2. Movement calculator
The information from the perception node can be used to recreate the board and calculate the robots next move. This decision will be made using discrete math taken from Eddie’s discrete final. The final decision of which piece to move will be sent to the path planner node.
3. Path Planner
Our set up will be using a specific chess board with a precise relationship to the Widow X arm. This will allow us to store the pose information of each square of the board such that when a piece is placed on a board we have a pose estimate for where it is based on which square it’s in. We can then create way-points along it’s trajectory to guide it.
4. Arm movement controller
Based on the way-point the arm is at is at the arm movement controller will guide the Widow X to move towards the point and tighten and loosen it’s grip as necessary.
Computational Setup
At the end of Milestone 1, we had a computational setup that sometimes worked, but was extremely finicky and unpredictable. During this milestone, we were able to convert this setup into one that can run the same way every time.
The main problem we were running into was that the repository we were following required a RealSense camera to properly run the server for the robot, but we were having issues properly configuring our camera while running our docker container. In order to solve this, we modified the code that ran the server and removed all camera topics (and any other code snippets that required them), and we are now planning to use a different (not RealSense) camera and read from it separately. This fix allowed us to finally start testing Python executable files on the physical robot.
Pick and Place
The library we used for our computational setup has several built-in
functions for moving the robot. There is a move() function, which
moves the end effector to a specified pose in Cartesian space (, y, z,
roll, pitch, yaw), a step_action() function, which moves the end effector
pose incrementally by the amounts specified, and a move_gripper()
function that opens and closes the gripper.
Using the functions specified above were able to implement a basic
pick and place function on our robot. This function takes a start point,
end point, the height required to grasp the object, and the clearance
height required for the move, and the robot then picks up an object
located at the start point and places it at the end point. The function
also contains a parameter for the maximum allowable gripper width
for picking and placing things in tight spaces.
Four Corners
In addition to Pick-and-Place, we also wrote a script that would move the end effector to each of the four corners of the chess board. Our goal with this script was to make sure that the arm had the capability to move its end effector to all the positions on our physical chess board.
Through initial testing with running files on the physical robot, we’ve been able to learn
1. Interbotix Python API basic commands such as `move()` and `step_action()`
- We are all new to the Interbotix python libraries. After completing Pick-and-Place and Four-Corners, we now have a better idea of how we’ll configure the robot to move to each square.
2. Compatibility between arm’s gripper and chess pieces
- We were worried that the arm would struggle to pick up chess pieces due to their cylindrical shape and that the gripper would be too wide to pick up individual pieces. Nevertheless, in the video above, we demonstrated its ability to pick up pawns in between other pieces.
3. Limits of the arm with our physical chess board
- We were concerned that the physical arm wouldn’t be able to reach the tiles furthest from its base. We found out that when setting move commands, the positions of the furthest tiles would exceed the joint limits. To address this issue, we’ve raised the arm’s apparatus to overlap with the side of the chess board. Now, our end effector should be able to reach all possible positions on the chess board.
Simulator
For the simulator with arm, we wanted to achieve live simulation both with and without the robot attached to the computer. We worked on the simulator as a fail-safe in case the team could not get the physical arm running and possibly for multiple people to be working on the arm at the same time.
-
-With Connected Arm
We were able to run the connected arm with the simulator with the instructions in a separate tab.
The commands open up an RViz display with the arm connected and the command moves the arm when arm commands are inputted through the control panel on RViz.
--Without Connected Arm
We were able to run the connected arm remotely without needing to connect with the arm with the following command:
ros2 launch interbotix_xsarm_control xsarm_control.launch.py robot_model:=wx200 use_sim:=true
However, since we have the MVP for the physical WidowX bot working, we have decided to move away from using the simulator and using the physical bot.
AprilTags
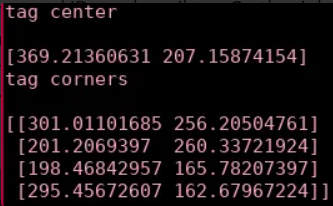
We also began working on detecting april tags and determining their positions using the python apriltag library. We wrote a script able to detect multiple april tags from a camera feed and get their IDs and position in the image. On the left is a screenshot of the output video feed, which outlines and IDs each april tag. On the right is part of the terminal output with the location of one of the tags, including the position of its center and corners. This information is printed about each tag and is constantly updating with their live positions.
Kinematic Math
Even though the kinematic math was abstracted by the Inter box API we still developed the flowing blog post that explains how the WidowX works. We felt that it was important to understand what was going on behind the scenes even if were weren’t manually completing the calculations. We therefore went through all of the math and how it's abstracted by the API
Looking forward!
Though we made good progress in the latest sprint we still have a ways to go! In order to make sure we stay on track we decided to break our remaining tasks into MVP task and stretch tasks.
For our MVP we would like to accomplish the following:
- Get everyone computationally set up
- Camera module
- Figure out where we want to put april tags (on pieces? chessboard corners?)
- MVP: 8x8 array of robot arm poses for each square
- MVP: pickup heights for each piece
- MVP(?): figure out how to pick up pieces on very corners of board without arm collapsing
- MVP: GUI to integrate chess engine
- convert engine move to physical move
- figure out which move the opponent made
In our MVP our robot would only be using the camera to identify the opponents move. The robot would then calculate it’s move and execute it by going to pre-saved poses.
For our stretch goals we would like to look at the following:
- April tags on edge of board to get a geometric map of the chess board (known distances between each square, pieces can be abstracted to the center point of each square)
- array of poses for graveyard
- figure out how to read move status from server so we dont’ have to do janky time.sleep stuff
- Camera
[ ] select which camera we’re using
- Post-MVP
[ ] mounting location for the camera
- physical camera mount design/fab(?)
- functional AprilTag code in Python: geometric poses between april tags (on 4 corners of chess board) relative to camera
- AprilTag code for transforming camera frame to arm frame
- post post post mvp: finger detection
In this implantation we could dig more into the machine vision aspect of the project: not only analyzing with machine vision but also finding more elegant, and sensor based methods of localization.
As we go into the next week Mia and Dan will be working on the GUI Eddie will be working on the pose array, Kate will continue working with April tags and and Will will be working on the literal edge cases of the chess words. We plan to have our MVP completed by Wednesday so that we have time to give some of our undivided a host and work on our website.
This site was created with the Nicepage